
How to Lash Downturned Eyes Without Making Them Look More Downward
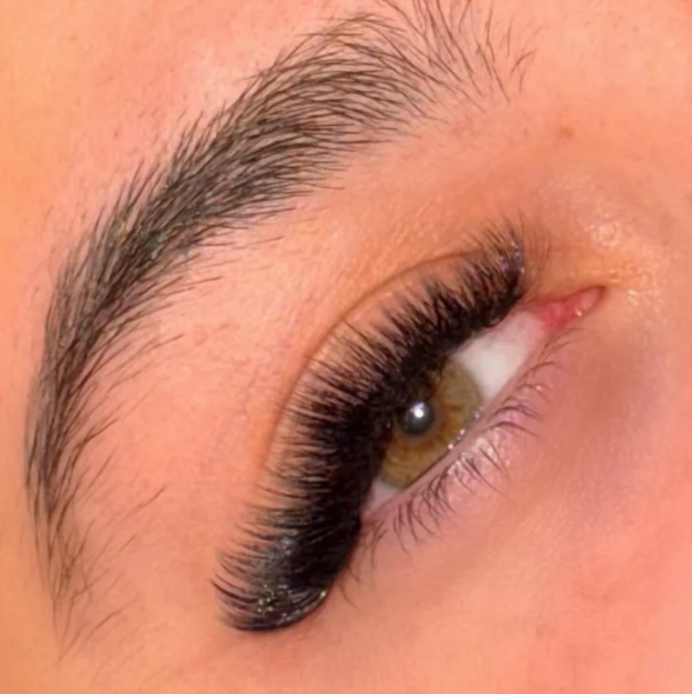
Downturned eyes can be one of the trickier eye shapes to style, especially if you want to create a lifted, open eyed finish.
The biggest mistake? Following the natural direction of the eye too closely.
When the outer corners naturally point downwards, adding too much length, weight or curl to the very outer lashes can actually emphasise that downward angle. Instead, your lash map should work with the eye shape to visually lift the outer area.
Here’s how to lash downturned eyes without making them look even more downward.
1. Don't automatically make the outer corner the longest
One of the most common mistakes when styling downturned eyes is placing your longest lengths right at the outer corner.
While this can work beautifully on some eye shapes, on a downturned eye it can pull the eye down visually.
Instead, think about where your peak length sits.
Rather than:
7 | 8 | 9 | 10 | 11 | 12
Try bringing the longest lengths slightly further in:
7 | 8 | 9 | 10 | 11 | 12 | 11 | 10
The exact lengths will depend on your client's natural lashes and eye shape, but the principle is simple: create your longest point before the very outer corner.
This helps create the illusion of lift.
2. Be careful with heavy curls on the outer corner
Curl choice can completely change the finished look.
If the outer lashes are naturally pointing downwards, using a curl that doesn't provide enough lift can exaggerate the shape.
Consider using a curl that gives you more visual lift, particularly towards the outer and upper sections of the lash line.
However, don't assume that the strongest curl is automatically the best option. You still need to consider the client's natural lash direction, thickness and condition.
The goal is lift without looking disconnected from the natural lashes.
3. Try a squirrel or lifted style map
For many downturned eyes, a squirrel style map can be a great starting point.
Instead of placing the longest lengths at the extreme outer corner, the length gradually increases towards the middle to outer section before decreasing again.
For example:
7 | 8 | 9 | 10 | 11 | 12 | 11 | 10
This creates a lifted focal point without dragging the eye down at the edges.
A soft cat-eye can still work for some clients, but you'll usually need to be more strategic with the lengths and curls rather than simply increasing length all the way to the outer corner.
4. Don't overload the outer corner
More length doesn't always mean more impact.
Adding very long, dense fans to the outer corner can create additional visual weight exactly where you are trying to create lift.
For downturned eyes, think about balance.
You may find that slightly shorter, lighter lashes on the very outer corner give a much more flattering result than pushing the length too far.
This is particularly important with volume or mega volume sets, where density can make the outer corner appear heavier.
5. Look at the client's eye from the front
When creating your lash map, don't only look at the eye from above while you're working.
Check your styling from the front.
Ask yourself:
- Where is the eye naturally turning down?
- Where does the brow sit?
- Where is the client's natural lash direction?
- Where should the eye appear to lift?
- Is the outer corner becoming visually heavy?
Your lash map might look perfect on paper, but the finished set is what matters.
6. Use styling to create an optical lift
Lash extensions are essentially about creating visual illusions.
With downturned eyes, your goal isn't necessarily to physically change the eye shape, it's to redirect the viewer's eye towards the lifted part of the lash line.
This can be achieved through:
Length placement + curl + density + direction.
Think about where you want the eye to look longest and most lifted, then build your map around that point.
7. Direction matters just as much as length
Two lash sets can use exactly the same lengths but look completely different depending on the direction of the extensions.
If your extensions follow the natural downward direction too closely, the finished set can still look downturned.
Instead, focus on creating clean, controlled direction through your placement.
Particularly around the outer corner, avoid allowing extensions to point dramatically downwards.
A beautiful lash set isn't just about choosing the right numbers on your map, it's about controlling the direction those lashes are travelling in.
8. Remember that every downturned eye is different
There isn't one universal lash map that works for every client with downturned eyes.
Some clients will have a subtle downturn. Others may have a much more pronounced outer corner drop.
You also need to consider:
- Natural lash length
- Natural lash direction
- Eye size
- Eyelid space
- Brow position
- Lash density
- Desired final look
- Client's natural lash health
This is why copying a lash map from a picture isn't always enough.
The same map can look completely different on two different clients.
The key takeaway
When lashing downturned eyes, don't fight the eye shape with excessive length at the outer corner.
Instead, create your longest point slightly before the outer corner, use an appropriate curl, control your direction and avoid adding unnecessary weight to the edge.
The result?
A set that looks lifted, balanced and intentionally styled rather than pulling the eyes further down.
And remember, a good lash map isn't about following a formula. It's about understanding your client's individual eye shape and using your styling choices to enhance it.
The best lash techs don't just apply lashes. They know exactly where to place them to create the effect they want.
Create the Perfect Set with PHATLASH
The right products can make all the difference when creating a beautifully balanced lash set. From high quality lashes in a range of curls and lengths to professional tweezers and reliable adhesives, PHATLASH has everything you need to bring your lash maps to life.
Whether you're creating a lifted set for downturned eyes or perfecting your client's go-to style, shop our professional lash range and find the products to help you achieve clean, consistent results every time.
Ready to upgrade your lash kit? Shop PHATLASH today.
Comments